How to Deploy an MCP Server on AWS Lambda (Streamable HTTP)
How I deployed a remote MCP server on AWS Lambda behind API Gateway: stateless Streamable HTTP, API key auth, CloudFormation, and Claude Desktop setup.
AWSserverlessAImcpNode.js
How I deployed a remote MCP server on AWS Lambda behind API Gateway: stateless Streamable HTTP, API key auth, CloudFormation, and Claude Desktop setup.
I wanted Claude to be able to query my SaaS's data directly from the chat window. Not through some copy-paste workflow. Not by uploading CSVs. I wanted to type "show me the top 10 users by activity this week" and get a real answer, pulled live from my own database.
That's when I found MCP.
Model Context Protocol is Anthropic's open standard for connecting AI assistants to external tools and data sources. Claude Desktop, Cursor, and other AI tools can connect to an MCP server, discover what tools it offers, and call them during a conversation. It's like giving your AI assistant a direct line to your backend.
But every tutorial I found showed the same thing: a local Node.js process, started with npx, talking over stdio. Great for trying it out on your laptop. Not great for a production SaaS that needs to be always available, authenticated, and deployed through CI/CD.
I already had my backend running on Lambda with Fastify. I had the RAG pipeline I wrote about in my last post. So naturally, I wanted MCP to live on the same stack. Same deployment process. Same auth. Same near-zero cost when idle.
It took some figuring out, but I got it working. Let me show you how.
Short answer: I run the MCP SDK inside a Lambda function behind an API Gateway HTTP API, using the Streamable HTTP transport in stateless mode (sessionIdGenerator: undefined). Each invocation gets a fresh transport, an API key check runs before the request reaches the SDK, and one CloudFormation template holds the function, the API, and the IAM role. It costs me about $7/month.
 Photo by Tim Witzdam on Pexels
MCP stands for Model Context Protocol. The name sounds fancy, but the concept is straightforward. It's a standard way for AI models to discover and call tools that live on your server.
Think of it like building a REST API, but instead of browsers and mobile apps calling your endpoints, an AI assistant calls them. You define tools with names, descriptions, and input schemas. The AI reads those descriptions, decides which tool to call based on the conversation, and sends a request. Your server runs the tool and sends back the result. The AI then uses that result to answer the user.
Here's what makes this different from just telling the AI to call a URL. MCP handles the whole lifecycle. The AI connects to your server, asks "what tools do you have?", gets back a list with descriptions and schemas, and then knows exactly how to call each one. You don't have to explain your API in the system prompt. The protocol handles discovery automatically.
For SaaS builders, this is a big deal. Your AI assistant can now query your own product's data. It can create records, run reports, trigger workflows. All through a standardized protocol that works with Claude Desktop, Cursor, Windsurf, and any other tool that supports MCP.
The typical MCP setup uses stdio transport, where the AI host spawns your server as a child process and communicates over stdin/stdout. That's fine for local development. But for production, you want HTTP transport. The AI sends HTTP requests to your server, and your server responds. No child processes. No local file access. Just clean HTTP, which is exactly what Lambda is built for.
The architecture is simple. It's the same pattern I've been using for everything else in my SaaS, just with an MCP handler instead of Fastify routes.
Here's the flow:
The key decisions:
Stateless HTTP transport. MCP supports three transports: stdio, SSE (Server-Sent Events), and Streamable HTTP. For Lambda, Streamable HTTP is the right choice. Lambda is stateless by nature. You don't have persistent connections. Each request comes in, gets processed, and returns a response. Streamable HTTP works the same way. A single POST request carries the MCP message, and the response comes back in the same HTTP response. No WebSockets. No long-lived connections. Perfect fit.
API Gateway HTTP API, not REST API. HTTP APIs are cheaper (\(1 per million requests vs \)3.50) and have lower latency. For MCP, you don't need the extra features of REST APIs like request validation or WAF integration. Keep it simple.
CloudFormation for infrastructure. Same as the rest of my stack. The Lambda function, API Gateway, and IAM role are all defined in a template. One aws cloudformation deploy command and it's live.
GitHub Actions for CI/CD. Same OIDC pattern from my first post. Push to main, tests run, CloudFormation deploys. No AWS credentials stored in GitHub.
 Photo by Brett Sayles on Pexels
The official MCP SDK makes this surprisingly easy. You create a server, register your tools, and the SDK handles the protocol details.
First, install the dependencies:
npm install @modelcontextprotocol/sdk zod
Now create the server and register some tools. I'm going to show three tools that tie into my SaaS: one for user stats, one for recent events, and one for querying documents (using the RAG pipeline from my previous post).
import { McpServer } from "@modelcontextprotocol/sdk/server/mcp.js";
import { z } from "zod";

const server = new McpServer({
  name: "hrr-saas-tools",
  version: "1.0.0",
});

// Tool 1: Get user statistics
server.tool(
  "get_user_stats",
  "Get activity statistics for a specific user including login count, API calls, and last active date",
  {
    userId: z.string().describe("The user ID to look up"),
    period: z.enum(["7d", "30d", "90d"]).describe("Time period for the stats"),
  },
  async ({ userId, period }) => {
    const stats = await fetchUserStats(userId, period);
    return {
      content: [
        {
          type: "text",
          text: JSON.stringify(stats, null, 2),
        },
      ],
    };
  }
);

// Tool 2: List recent events
server.tool(
  "list_recent_events",
  "List recent system events like signups, upgrades, cancellations, and errors. Returns the most recent events sorted by timestamp.",
  {
    eventType: z
      .enum(["signup", "upgrade", "cancellation", "error", "all"])
      .optional()
      .describe("Filter by event type. Defaults to all."),
    limit: z
      .number()
      .min(1)
      .max(50)
      .optional()
      .describe("Number of events to return. Defaults to 10."),
  },
  async ({ eventType, limit }) => {
    const events = await fetchRecentEvents(eventType || "all", limit || 10);
    return {
      content: [
        {
          type: "text",
          text: JSON.stringify(events, null, 2),
        },
      ],
    };
  }
);

// Tool 3: Query documents (RAG)
server.tool(
  "query_documents",
  "Search the knowledge base using natural language. Uses semantic search to find relevant documents and returns matching content with source references.",
  {
    question: z.string().describe("The natural language question to search for"),
  },
  async ({ question }) => {
    const results = await queryRagPipeline(question);
    return {
      content: [
        {
          type: "text",
          text: JSON.stringify(results, null, 2),
        },
      ],
    };
  }
);
A few things to notice about this code.
The tool descriptions matter a lot. The AI reads them to decide which tool to call. If your description is vague, the AI won't know when to use the tool. I spent a couple of hours refining these descriptions after watching Claude pick the wrong tool during testing. Be specific about what the tool does and what it returns.
The Zod schemas define the input parameters. The SDK converts them to JSON Schema automatically, which the AI uses to construct valid inputs. Adding .describe() to each parameter helps the AI understand what values to pass.
Each tool function returns a content array with text items. This is MCP's response format. You can also return images and other content types, but for most API tools, text with JSON is what you want.
The fetchUserStats, fetchRecentEvents, and queryRagPipeline functions are your actual business logic. They can call your database, hit other APIs, or do whatever your SaaS needs. I kept them out of this example to focus on the MCP wiring, but they're just regular async functions.
 Photo by Lukas Blazek on Pexels
Now here's the part that took the most figuring out. You need to adapt the MCP server to run inside a Lambda function, handling HTTP requests from API Gateway.
MCP's Streamable HTTP transport works over regular HTTP POST requests. The client sends a JSON-RPC message in the request body, and the server responds with a JSON-RPC response. Lambda handles this naturally since each invocation is one request-response cycle.
import { McpServer } from "@modelcontextprotocol/sdk/server/mcp.js";
import { StreamableHTTPServerTransport } from "@modelcontextprotocol/sdk/server/streamableHttp.js";

// Create the MCP server (same setup as before)
const server = new McpServer({
  name: "hrr-saas-tools",
  version: "1.0.0",
});

// Register tools here (same as previous section)
// ...

export const handler = async (event) => {
  // Parse the incoming request
  const body = JSON.parse(event.body || "{}");
  const headers = event.headers || {};

  // Create a transport for this request
  const transport = new StreamableHTTPServerTransport({
    sessionIdGenerator: undefined, // Stateless, no sessions
  });

  // Connect the server to the transport
  await server.connect(transport);

  try {
    // Process the MCP request
    const response = await transport.handleRequest({
      method: "POST",
      headers: {
        "content-type": headers["content-type"] || "application/json",
      },
      body,
    });

    return {
      statusCode: response.status || 200,
      headers: {
        "Content-Type": "application/json",
      },
      body: JSON.stringify(response.body),
    };
  } finally {
    // Clean up the transport
    await transport.close();
    await server.close();
  }
};
There's an important detail here. I set sessionIdGenerator to undefined. This tells the transport to operate in stateless mode, which means no session tracking between requests. Every request is independent. That's exactly what you want on Lambda. There's no guarantee the same Lambda instance will handle consecutive requests, so sessions don't make sense.
This means your MCP server won't support features that require state, like subscriptions or resource change notifications. But for tool calls, which is the main use case for a SaaS backend, stateless is perfect. The client sends a request, your tool runs, and the result comes back. No state needed.
One thing I learned the hard way: you need to create a new transport instance for every invocation. Don't try to reuse the transport across Lambda invocations. The MCP SDK expects a fresh transport for each connection. I tried to optimize by caching it outside the handler, and requests started silently failing. Spent two hours on that one.
The server instance itself can be reused across invocations though. Creating the server and registering tools is lightweight, and Lambda keeps the module-level variables alive between warm invocations. So the server definition lives outside the handler, and only the transport gets created fresh each time.
Your MCP server exposes your SaaS's internal tools. You absolutely need authentication. Without it, anyone who finds your API Gateway URL can query your user data, trigger actions, and poke around your backend.
I went with API key authentication. It's simple, it works well for MCP, and Claude Desktop supports it natively through header configuration.
Here's how I validate the key in the Lambda handler, before the request ever reaches the MCP SDK:
function validateApiKey(event) {
  const authHeader = event.headers?.["authorization"] || "";
  const apiKey = authHeader.replace("Bearer ", "");

  if (!apiKey) {
    return { valid: false, error: "Missing API key" };
  }

  // Compare against the stored key
  // In production, use a hashed comparison or AWS Secrets Manager
  const expectedKey = process.env.HRR_MCP_API_KEY;

  if (apiKey !== expectedKey) {
    return { valid: false, error: "Invalid API key" };
  }

  return { valid: true };
}

export const handler = async (event) => {
  // Validate auth before doing anything else
  const auth = validateApiKey(event);
  if (!auth.valid) {
    return {
      statusCode: 401,
      headers: { "Content-Type": "application/json" },
      body: JSON.stringify({ error: auth.error }),
    };
  }

  // MCP handling continues here...
  const body = JSON.parse(event.body || "{}");
  // ... rest of the handler
};
The API key gets stored as a Lambda environment variable. For better security, you could pull it from AWS Secrets Manager or Systems Manager Parameter Store. But for my use case, an environment variable encrypted with the default Lambda service key works fine.
When you set up Claude Desktop later, you'll put this key in the config file. The client sends it as a Bearer token in the Authorization header on every request. Simple and effective.
One more thing. If you want to support multiple users with different access levels, you can extend this to look up the API key in a database and attach permissions. Some of my tools should only be accessible to admin users, not regular team members. I added a simple role check after key validation:
async function validateApiKeyWithRole(event) {
  const authHeader = event.headers?.["authorization"] || "";
  const apiKey = authHeader.replace("Bearer ", "");

  if (!apiKey) {
    return { valid: false, error: "Missing API key" };
  }

  // Look up the key and its associated role
  const keyRecord = await getApiKeyFromDatabase(apiKey);

  if (!keyRecord) {
    return { valid: false, error: "Invalid API key" };
  }

  return { valid: true, role: keyRecord.role, userId: keyRecord.userId };
}
Then in your tool functions, you can check the role before executing sensitive operations. This keeps your private SaaS tools locked down while still letting you give different team members different levels of access.
The infrastructure is minimal. One Lambda function, one API Gateway HTTP API, one IAM role. If your tools need database access, add a VPC configuration. Otherwise, keep it simple.
Here's the CloudFormation template:
AWSTemplateFormatVersion: "2010-09-09"
Transform: AWS::Serverless-2016-10-31

Parameters:
  McpApiKey:
    Type: String
    NoEcho: true
    Description: API key for MCP server authentication

Resources:
  McpFunction:
    Type: AWS::Serverless::Function
    Properties:
      FunctionName: hrr-mcp-server
      Handler: index.handler
      Runtime: nodejs20.x
      MemorySize: 512
      Timeout: 30
      CodeUri: ./dist
      Environment:
        Variables:
          HRR_MCP_API_KEY: !Ref McpApiKey
          NODE_OPTIONS: "--enable-source-maps"
      Events:
        McpEndpoint:
          Type: HttpApi
          Properties:
            ApiId: !Ref McpHttpApi
            Path: /mcp
            Method: POST

  McpHttpApi:
    Type: AWS::Serverless::HttpApi
    Properties:
      StageName: prod
      CorsConfiguration:
        AllowOrigins:
          - "*"
        AllowMethods:
          - POST
          - OPTIONS
        AllowHeaders:
          - Authorization
          - Content-Type

Outputs:
  McpEndpoint:
    Description: MCP server endpoint URL
    Value: !Sub "https://\({McpHttpApi}.execute-api.\){AWS::Region}.amazonaws.com/prod/mcp"
That's the whole thing. No VPC, no NAT gateway, no load balancer. If your tools only call external APIs or other AWS services, you don't need VPC access. My user stats and events tools call DynamoDB and my existing API, so they work fine without a VPC. The RAG tool calls RDS through RDS Proxy, which does need VPC access. I added that tool to a separate Lambda in the same VPC as my main application.
If your MCP server has to stay private inside a VPC with AgentCore Gateway in front of it, I wrote up how to make the gateway trust a private CA without adding an ALB.
For deployment, I use the same GitHub Actions workflow from my first post. OIDC authentication with AWS, no stored credentials:
name: Deploy MCP Server

on:
  push:
    branches: [main]
    paths:
      - "mcp-server/**"

permissions:
  id-token: write
  contents: read

jobs:
  deploy:
    runs-on: ubuntu-latest
    steps:
      - uses: actions/checkout@v4

      - uses: actions/setup-node@v4
        with:
          node-version: "20"

      - name: Install and build
        working-directory: mcp-server
        run: |
          npm ci
          npm run build

      - name: Configure AWS credentials
        uses: aws-actions/configure-aws-credentials@v4
        with:
          role-to-assume: arn:aws:iam::123456789012:role/hrr-github-deploy-role
          aws-region: us-east-1

      - name: Deploy
        working-directory: mcp-server
        run: |
          aws cloudformation deploy \
            --template-file template.yaml \
            --stack-name hrr-mcp-server \
            --capabilities CAPABILITY_IAM \
            --parameter-overrides McpApiKey=${{ secrets.MCP_API_KEY }}
Push to main, the workflow builds, deploys, and your MCP server is live. The API key comes from GitHub Secrets so it never touches your code. The OIDC role setup is covered in detail in my first post if you need to set that up from scratch.
 Photo by Eclipse Chasers on Pexels
This is the payoff moment. You've built the server, deployed it, and now you want Claude to actually use it.
Claude Desktop uses a config file to know about your MCP servers. On macOS, it's at ~/Library/Application Support/Claude/claude_desktop_config.json. Open it up and add your server:
{
  "mcpServers": {
    "hrr-saas": {
      "url": "https://abc123.execute-api.us-east-1.amazonaws.com/prod/mcp",
      "headers": {
        "Authorization": "Bearer hrr_mcp_live_a1b2c3d4e5f6"
      }
    }
  }
}
That's it. Restart Claude Desktop, and it will connect to your MCP server, discover your tools, and make them available during conversations.
You can verify it's working by clicking the hammer icon in Claude Desktop's input area. You should see your three tools listed: get_user_stats, list_recent_events, and query_documents. If they show up, your server is connected.
Now try asking Claude something like:
"Show me the top users by activity in the last 30 days."
Claude will recognize that it needs the get_user_stats tool, construct the right parameters, call your Lambda function through API Gateway, and present the results in the conversation. The first time I saw this happen with my own data, I just sat there grinning.
You can also test with more complex queries that chain tools together. Try: "Are there any errors in the last 24 hours related to users who signed up this week?" Claude will call list_recent_events for the errors, then cross-reference with signup events. It figures out the multi-step plan on its own.
For Cursor and other MCP-compatible tools, the configuration is similar. Cursor uses a .cursor/mcp.json file in your project root:
{
  "mcpServers": {
    "hrr-saas": {
      "url": "https://abc123.execute-api.us-east-1.amazonaws.com/prod/mcp",
      "headers": {
        "Authorization": "Bearer hrr_mcp_live_a1b2c3d4e5f6"
      }
    }
  }
}
Same URL, same auth. Your MCP server works with any client that supports the Streamable HTTP transport.
I've been running this MCP server in production for a few weeks now. Here's what I've learned along the way.
This one seems obvious now, but I actually tried SSE first. Server-Sent Events keep a connection open and stream responses back. That's great for a long-running server process. It's terrible for Lambda. Lambda has a maximum response timeout, and API Gateway will cut the connection after 29 seconds. SSE connections are meant to stay open indefinitely.
Streamable HTTP works differently. One POST request, one response. The MCP SDK handles the protocol framing within that single request-response cycle. On Lambda, each invocation processes exactly one MCP message and returns. Clean, simple, and fits Lambda's execution model perfectly.
Stdio transport isn't even an option for remote deployment. It requires the MCP client to spawn the server as a child process on the same machine. That's localhost only.
So if you're deploying MCP to any cloud environment, not just Lambda, Streamable HTTP is almost certainly what you want.
The AI uses your tool descriptions to decide which tool to call. If your description says "gets data," the AI has no idea when to use it. If your description says "Get activity statistics for a specific user including login count, API calls, and last active date," the AI knows exactly when this tool is relevant.
I tested this directly. My first version of list_recent_events had the description "List events from the system." Claude would call it for almost every question, even ones that had nothing to do with events. I rewrote the description to be specific about what kinds of events it returns, and the tool selection accuracy went way up.
Same goes for parameter descriptions. The .describe() calls on your Zod schemas aren't just documentation. They're instructions for the AI. "The user ID to look up" tells the AI to extract a user ID from the conversation. Without that description, the AI sometimes guesses at the parameter format.
Spend time on your descriptions. They're the interface between the AI and your tools.
When something goes wrong with an MCP tool call, you need to figure out what happened. Was it a bad request from the AI? A timeout calling your database? An error in your tool function? Without good logging, you're guessing.
I log three things for every MCP request:
function logMcpRequest(toolName, params, result, duration) {
  console.log(JSON.stringify({
    type: "mcp_tool_call",
    tool: toolName,
    params,
    resultSize: JSON.stringify(result).length,
    durationMs: duration,
    timestamp: new Date().toISOString(),
  }));
}
This gives me structured JSON logs in CloudWatch that I can query with Logs Insights. I can find all calls to a specific tool, see average response times, and track error rates. When a user reported that Claude was giving wrong answers from the query_documents tool, I pulled the logs and saw that the RAG retrieval was returning low-similarity chunks. The fix was tuning the similarity threshold, not changing anything in the MCP layer.
MCP tool calls feel synchronous to the user. They ask Claude a question, Claude calls your tool, and the user waits for the response. If your Lambda has a cold start, that adds 1-2 seconds to the response time. On top of the time Claude takes to think, that's noticeable.
I use provisioned concurrency for my MCP Lambda. One instance stays warm at all times. It costs about $5/month for a 512MB function and eliminates cold starts for the first concurrent request. If you're getting more than one simultaneous MCP call, you might want two provisioned instances. But for most single-user setups, one is enough.
If you don't want to pay for provisioned concurrency, at least keep the function warm with a CloudWatch Events scheduled rule that pings it every 5 minutes. It's not as reliable as provisioned concurrency, but it helps.
Claude can now query my SaaS's data without me copy-pasting anything. I ask a question in the chat window, it calls my tools on Lambda, and I get real answers from my own database. No context switching. No manual lookups. It just works.
The whole setup costs me about $7/month on top of what I was already paying. That's the Lambda invocations, the API Gateway requests, and one provisioned concurrency instance. The infrastructure is three resources in a CloudFormation template. Deployment is a git push.
Looking back, the hardest part wasn't the code. It was figuring out which MCP transport to use and how to handle the stateless nature of Lambda. Once I landed on Streamable HTTP with a fresh transport per invocation, everything fell into place. The MCP SDK does most of the heavy lifting. Your job is to write good tool descriptions and solid business logic behind them.
I think every SaaS should have an MCP server. Not today, maybe. But soon. The way we interact with our own products is changing. Instead of clicking through dashboards, you'll ask your AI assistant. And the SaaS products that make this easy, the ones that expose their data through MCP, will have a real advantage.
If you already have a Lambda stack running, you're closer than you think. A few hundred lines of code and you've got a production MCP server.
Now go give your AI assistant something useful to do.
Streamable HTTP. One POST carries the MCP message and the result comes back in the same response, which matches Lambda's request-response model. Stdio only works when the client spawns the server on the same machine, and SSE wants a long-lived connection that API Gateway cuts after 29 seconds.
No. I tried caching it outside the handler and requests started failing silently. Create a new transport per invocation. The McpServer instance and its registered tools can live at module level and be reused on warm invocations.
Whatever you register with server.tool(). Mine exposes get_user_stats, list_recent_events, and query_documents. The client discovers them on connect, and in Claude Desktop they show up under the hammer icon. Specific tool descriptions matter, because the model uses them to pick which tool to call.
Add the API Gateway URL and an Authorization: Bearer header under mcpServers in claude_desktop_config.json, then restart Claude Desktop. Cursor takes the same block in .cursor/mcp.json.
Hope you enjoyed this walkthrough. If you're building an MCP server on AWS or have questions about any of the pieces, I'd love to hear about it.
Follow me on Twitter/X for more posts about AWS, serverless, and building AI-powered products. I share the stuff that actually works in production.
 Photo by cottonbro studio on Pexels
I email when a new post goes up. One send a week, and only if there's something new.
Want this applied on your account? Start with Serverless Infrastructure.
Related reading
Kept below the post instead of in a sidebar, with a slow continuous motion for a cleaner editorial feel.
Aug 19, 2026
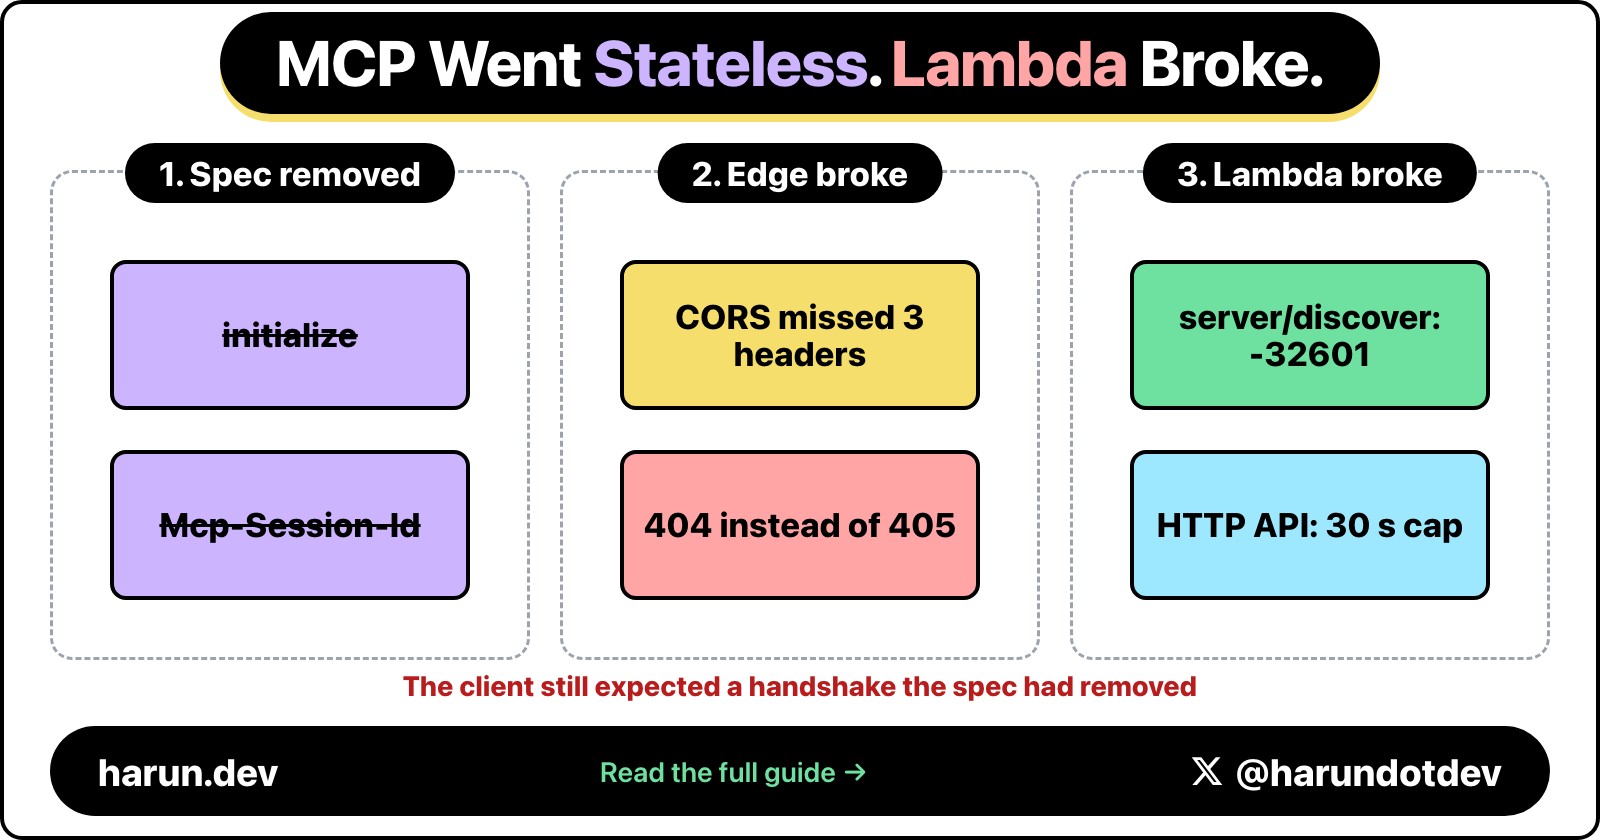
The 2026-07-28 MCP spec deleted the initialize handshake and Mcp-Session-Id, which should have been free for a Lambda server that was already stateless. It wasn't: a CORS allow-list, a missing server/discover, a 404 that should have been a 405, and a notification stream an HTTP API can't hold open all broke behind API Gateway.
Apr 4, 2026
I was knee-deep in building my SaaS when users started asking questions I couldn't answer from the UI alone. My app had a solid backend, Lambda functions, Fastify, PostgreSQL on RDS. I wrote about tha
Mar 19, 2026
Queue document analysis, summarization, and classification with SQS. Process them with Lambda and Bedrock. No servers, no polling, no wasted spend.
Aug 19, 2026
The 2026-07-28 MCP spec deleted the initialize handshake and Mcp-Session-Id, which should have been free for a Lambda server that was already stateless. It wasn't: a CORS allow-list, a missing server/discover, a 404 that should have been a 405, and a notification stream an HTTP API can't hold open all broke behind API Gateway.
Apr 4, 2026
I was knee-deep in building my SaaS when users started asking questions I couldn't answer from the UI alone. My app had a solid backend, Lambda functions, Fastify, PostgreSQL on RDS. I wrote about tha
Mar 19, 2026
Queue document analysis, summarization, and classification with SQS. Process them with Lambda and Bedrock. No servers, no polling, no wasted spend.
On this post
Comments
A reply stays under the note it answers.
No comments yet.
If you have a note on How to Deploy an MCP Server on AWS Lambda (Streamable HTTP), sign in and leave it.